Every time I post a picture on my Facebook page of Turmeric, it has attracted heaps of interest. It’s Turmeric harvest season in my backyard patch right now, and last weekend I dug over six kilos of the bright rhizomes, and I have been spending a great deal of time since turning it into a rich orange aromatic powder. (authors note: I updated step 2 in July 18).
When I mentioned on my Facebook page that I was planning to dry some Turmeric for the very first time, a number of people wanted to know how I intended to do it, so after successfully filling a number of containers with the colourful spice I can now share how I dried my Turmeric.
How to Dry Turmeric
1. Boiling the rhizomes
 Cleaning: Using a scrubbing brush clean off all of the soil and any lose skin from the rhizomes. You will need to separate the rhizome into smaller bits as you scrub. It snaps apart quite easily so it’s not a problem. Breaking it apart will ensure that you remove all of the soil that might be hidden in any tight crevices in the rhizomes.

Cooking: Place your rhizomes into a pot and cover with cold water, ensuring that there is around 2 cm of water covering it all. Bring to the boil, and then simmer until you can easily push a skewer through the rhizome. Be careful not to overcook them because it will draw out to much goodness and colour from the rhizomes into the water. 25-30 minutes did the trick when I cooked them. Cooking the rhizomes breaks down the fibers, and evens up the colour.
2. Dehydrator or Oven Drying?
I have used two different methods over the years to dry the Turmeric. I have dried it in the oven and also used dehydrator. Both methods work well, but the dehydrator is by far the easier process and gives a superior result. It is a much brighter colour and it dries more evenly.If Oven Drying, follow this method: When cooked, drain and allow to cool. When they are cool enough to handle, cut into even slices around 3 mm thick. Some I sliced length-ways, others across the rhizome. Spread the sliced Turmeric evenly onto a tray lined with baking paper. I used foil for some batches, but I soon learnt that baking paper is easier to handle. They can stick to foil, but didn’t stick to paper.
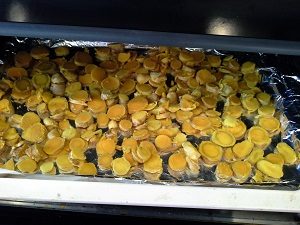 Place the tray into a pre-heated oven that is set to 180 degrees for one and a half to two hours. Turn them after 30 minutes and check again every 20 minutes to make sure that they don’t burn. I dried them until the pieces would easily ‘snap’ when I tried to bend them. If they were still slightly flexible, they still had too much moisture content and I put them back. At the latter stages of drying I removed the smaller bits that were dry enough with a pair of tongs, and put the big bits back into the oven. When they are dry, they don’t look very promising, they are shriveled, dark in colour. When I did the first batch I thought I had ruined the lot. But I was soon proven wrong.
 When cooked, drain and allow to cool. When they are cool enough to handle, cut into even slices around 3 mm thick, length-ways or across the rhizome. Place a single layer onto your drying trays ans stack them onto your dehydrator. I dried them at 70 degrees Celsius for close to 15 hours until they I was able to 'snap' the pieces. If you have a dehydrator like mine, every couple of hours you may need to swap the trays around so that they dry evenly.
3. Blitzing
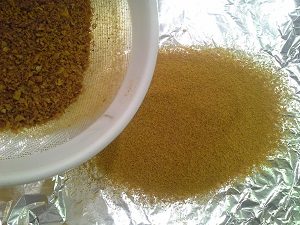 Processing: I used the Thermomix to blitz them in batches for one minute at full speed. Then I poured about half a cup into a sieve and sifted it onto a plate. I used the back of a spoon to push it through a bit. The larger bits went back into the Thermomix for a second and later a third whizzing to break them down even further. I continued this process until the whole batch was sifted into a nice orange pile of real fresh, home grown, colourful Turmeric that has a fantastic earthy aroma.
Storage: Place into an airtight container in the spice cupboard ready to use liberally as needed.
Lessons I learnt
The oven is a great way to dry Turmeric, but I reckon that a proper dehydrator will do a better job. It eliminated the chance of burning the Turmeric and also the colour of the final product is brighter. Also, oven drying can burn easily if you are not careful in the latter stages of drying. I managed to lose a whole batch so I would recommend if it’s your first attempt that you do a small batch first, to gain some experience before you get really serious. Do yourself a favour as you follow this process, wear some gloves if you don’t want yellow fingers. Also, wipe any spills up quickly before they stain your bench top!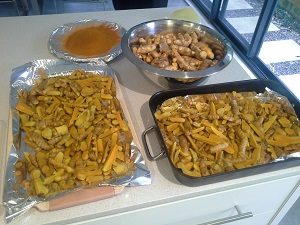
It was quite a process to turn my Turmeric rhizomes into powder and I now have 700 g of the delightful spice. I now know how to do it, and I’ll definitely be doing it all over again. Have a go at it and share how you went, I dare you to!
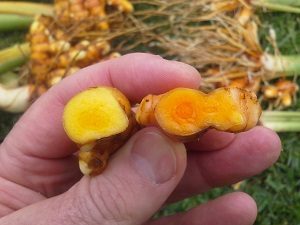
Turmeric Varieties
 I started to grow Turmeric two years ago and now I grow two different types, a yellow rhizome called ‘Aromatica’ and an orange rhizome called ‘Longa’. Over the past couple of years Turmeric has become one of the celebrated spices because of the many health benefits it can provide. Every day I consume Turmeric in some form. I really love using Turmeric in the food I cook and I use it in curries or soups and every day I have been having a hot golden milk drink. It adds colour into any dish, it is aromatic and it is really good for you.
From recent reading that I have done, the Longa variety has higher content of the important ingredient ‘Curcurmin’ which is consumed for its health benefits. The main reason I consume it is as an anti-inflammatory and I can confidently say that it works for me. You had better do your own research to see if it is something you would want to use.

My next blog will let you know how easy Turmeric is to grow in your garden. It really does taste quite fantastic – earthy is the best way I can describe it
]]>
Looking for more help?
Find out more about our services including garden advice, setup and design. Available within a 50km radius of Newcastle.